TIPS for Digital Camera Group |
 |
| Prev Tip | Next Tip |
Composition 11 - Lighting
|
It doesn't matter what sort of camera you use, but following a few simple guidelines can generally improve your photos.
In this tip we will talk about "Lighting".
This topic has been left until last because there are so many ways to light a subject, and a lot depends on what effect you want to create and what resources you have available. When you research photographic lighting you will see terms like "Back Light", "Broad Light", "Fill Light", "Flat Light", "Short Light", "Split Light" and so on. The best light of course is "daylight", but even that varies between a dull day, a cloudy day, a sunny day, whether you are in the open or in shade, time of day, and so on. Basically the more light you have available, the greater the contrast, but in some cases the light may be too bright and wash out some of the colour, so you have to quickly decide what is appropriate. Colour Temperature One aspect that you always need to be aware of is the colour temperature of the light falling on your subject. Colour temperature is expressed in Kelvins and is the temperature of an ideal black-body radiator that radiates light of a colour comparable to that of the light source. |
||
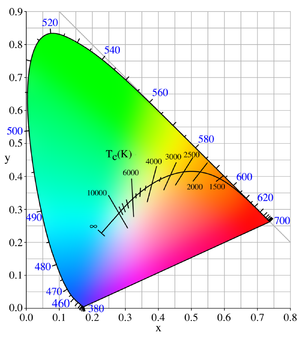 |
The CIE 1931 or "Planckian Locus" colour space chromaticity diagram shown here shows the displayable colours within the sRGB spectrum and their associated wavelengths in nanometers.
While the colour temperature of sunlight above the atmosphere is about 5900K, summer sunlight on a clear day at noon will typically be around 5500K. This gives a rather cool appearance because the light is saturated in green and blue wavelengths which enhances the cooler object colours. In the early morning and late evening the colour temperature will fall to around 5000K or lower resulting in warmer (redder) colour rendering. By comparison, indoor lighting is generally around 6500K for cool white LEDs and 3000K for warm white LEDs. |
|
 |
Hues of the Planckian locus on a linear scale (values in Kelvin). |
|
Reflective Surfaces |
||
|
Reflective surfaces create a different problem.
In the example here, there was fairly strong sun, so the trick was to avoid the reflection coming from the large white area, to avoid making the background appear darker.
Where you have insufficient light you may decide to use "Flash", but using the flash built into your camera seldom gives good results, so should only be used a a last resort unless it is for fill. |
 |
|
|
Indoor Lighting Indoor lighting is completely different, because you may have to deal with many different light temperatures - some supposedly white light will appear yellow, green, blue, or various shades in between. This is because there will be light reflecting off various coloured surfaces nearby, rather than a single source of light. |
||
|
This is where "flash" can give you a more consistent colour, but it can also give you strong contrasting shadows and other effects such as red eye or flushed looking faces, etc.
To avoid this, the flash must be located somewhere other than on the camera, and to soften the contrast, a reflector (often an umbrella or collapsible reflector) should be used. In fact, the latter also work very well in daylight to help light a subject. And it is even better if someone else is available to hold it for you. |
 |
|
| If you use Google Search and look for information on photographic lighting techniques, you will find hundreds of interesting options. As for collapsible reflectors, these can be purchased in NZ for around $20 (5-colour set), and you will need a remote flash too but these are somewhat more expensive. | ||